Hey guys, in case you lose your email, here is another link to my first livestream. as i go foreword (and fix my computer) i will hopefully be on livestream a lot more
MyLiveStream
also, i want to try using a google+ page for the class for posting progress, chatting, bad mouthing me, and getting outside input from my peoples.
...once i figure out how to link it...i will
18.10.12
Here are some of the screenshot notes that we took in class along with some additional insight on each. these are grabbed randomly so i will try and group them together as best i can based on relevance
 "replace with" is great for blocking in modular pieces and then giving the scene variation with alternate meshes and pieces
 here is our Material layout for the glass windows we made (i told you its random)
 Levels are a big one for UDK, this is a great way to break up your scene so multiple people can work on it. It also works great for isolating lights in your scene and switch loading zones
 Layers are a good way to set up selection sets that you can hide and unhide while you are working. i will usually have buildings on a layer, lights on a layer, the ground on a layer, effects etc... this way i don't run the risk of grabbing things i don't want to grab while working by hiding or locking a layer
i hope some of these act as a good refresher of what we have done so far in class


i hope some of these act as a good refresher of what we have done so far in class
Hey Guys, I am trying to get into the habit of recording my progress as I work on class projects. Hopefully I can keep this habit going so we can get as much extra feedback and input as possible.
Here is how I make organic modular rock faces
This one is how i quickly block out my pieces for the temple. i would then take each section like I do with the stairs to a final stage
Here is how I make organic modular rock faces
This one is how i quickly block out my pieces for the temple. i would then take each section like I do with the stairs to a final stage
3.10.12
HEY GUYS!! here are some of the screen grabs from class that are in the notes folder (which is sooooo hard to find)
okay, first off, bump offset. here is a quick shot of my roughed in nodes from class followed by a quick video I found on the youtubes (I have stressed a few times, all of this information is all over the internet in great detail)

Your black and white height map goes into the height slot for the bump offset (NO WAY, THAT SIMPLE!!)now important...VERY IMPORTANT! bump offset can only take 8bit information. that means only a grayscale map. so grab a color node, not the black channel of the texture.
the bump offset now plugs into the UV channel of your textures.
Video
Next up is the glass we made, the trick to glass is how you use your spec and opacity together to fade out the reflection. remember dust will build up around the edges and on the grease of finger prints.where there is dust, there is no specularity, and there it will be more opaque.

2.10.12
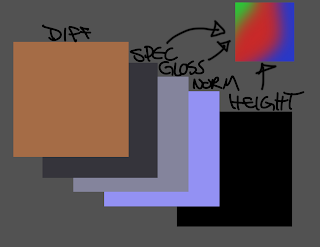
Hey guys, here is the minimum textures for each material that we went over last week. I am also including a link to the Photoshop file so you can deconstruct my files
PhotoshopFile
PhotoshopFile

27.9.12
HOMEWORK FOR WEEK 5
create a block out of your scene, focus on your big shapes, composition, and hiding/revealing the goal as the player moves through the passages
we want the scene to be as grand as possible, think guild wars, uncharted and emperors new groove
once you have your scene blocked in, do a paintover or call-out sheet to show what you are thinking for each section, either way bring lots of reference with you.
you are allowed a total of 1024 for the textures of the scene, so plan accordingly. here is how i rough in my texture sizes for reference:

25.9.12
This is a really good resource for not just our classes but also when you start to work on your portfolios
WOLD breaking down environments in games
WOLD breaking down environments in games
Subscribe to:
Posts (Atom)